Showing posts with label Rubber stamping. Show all posts

Sunday, 7 July 2019

Christmas in July at IAAS

Good morning.  Hope this finds you all well.  At IAAS this month the theme, chosen by Jennie, is Christmas in July.  Where Christmas cards are concerned it's Christmas all year round for me.  I love making them, sends masses of them and so make them continually.

(If you are looking for my Christmas Card Club entry please scroll down to previous post.)

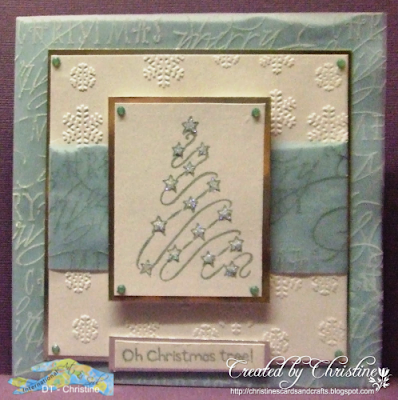
My Card


Recipe
6" square base card
Christmas Script background stamp  - Denami Designs
Star Swirl Tree - Denami Designs
blue vellum - stash

I have had the  Denami Designs rubber stamps  for about 15years but haven't used them for years. It's amazing what we find at the back of drawers.  These are really lovely and I'm sure I'll be using  them again soon.

I cut a piece of blue vellum to cover the card front and wrap around the back so that I didn't have to worry about showing any glue etc.. I stamped the Script stamp in white onto the vellum and heat embossed with Ranger Frosted Crystal embossing powder and attached it to the card front. Onto a narrow strip of the blue vellum I again stamped the Script stamp, this time with Brilliance Pearlescent Ice Blue and heat embossed with the same powder to give a different effect, although the difference is quite subtle. I embossed a piece of white card stock with Crafts Too embossing folder Snowflakes, wrapped the vellum strip round it, matted it onto silver mirri and attached to the centre. The star swirl tree was stamped with the blue ink and the same embossing powder and matted onto silver mirri. It wouldn't be Christmas without a bit of glitter so I added blue glitter to the star, and a bit of bling to the corners. The picture is really bad I'm afraid. It is quite shadowy where the vellum is loose because I only attached it to the back of the card where it overlapped and underneath the snowflake panel. It really does look far better in real life.

Take care and happy crafting.


Monday, 10 April 2017

Masculine Card

Good morning.  Well after two fabulous days it looks like the weather is set to change. Still we must enjoy it while it's here.

Today's card is a one for the male of the species.  Not always the easiest to make cards for I must confess.

My Card


Recipe
A5 card base - dark green card stock Jelly Bean Crafts
gold mirri card
Leaf word stamp - Hero Arts
maple leaf punch
Spellbinders foliage die
green and gold ribbon from stash

I've just realised I forgot to add the pearl to the base of the leaf trio!  I used a clear ink pad and detail gold embossing powder to the word stamp. A little more mirri card than I would generally use but I thought the dark card needed something to brighten it up a little.

Anyway that's it from me. Take care and enjoy your day.


Sunday, 10 May 2015

Christmas Card Club # 10 - Village Scene

Good morning to all my friends and anybody who has just dropped by. Hope everybody is keeping well.  It is more like April than May we are having so many heavy showers.

Another two weeks have passed and  it is Rita's turn to choose our topic for the Christmas Card Club, which is to depict a Village Scene.  When I first started card making, seems so long ago, I bought two Christmas stamps and this is one of them.  I really love them both.  They were made by an American company called PSX which no longer exists.  I have a number of other PSX stamps and they are fabulous - so detailed and deeply etched rubber.

My Card


inside card

Recipe
Blue Sapphire pearlescent card - Brothersleep
Village rubber stamp - PSX
Sentiment rubber stamp - Stampendous (also very old)
Snowflake Lattice e/f - Sue Wilson
Auvergne & Provence dies - Sue Wilson

I cut my base card and folded it to 5" x 7".  I inserted the front into the embossing folder and then inserted the inside and embossed it so that I would get the embossed side on both parts, rather than a de-bossed inner. After stamping the image in French Navy Fabrico ink I used lashings of Twinklets Diamond Dust to make it very icy. All it needed than was die cutting some of the blue and white card to frame the image.  I added some pearlescent snowflake peel offs for a little more sparkle. Well, it's Christmas!!!

I hope you enjoy the rest of your weekend, particularly those of you who are still at work - these days are so precious!

Take care!


Sunday, 4 May 2014

Christmas Card Club - # 10 - Poinsettias

Good morning and I hope you are all well and enjoying the Bank Holiday weekend.  Friday was almost like winter here in Oxfordshire but yesterday, although it started very chilly turned into a beautiful warm sunny day.  When I drove to the next village to collect the newspaper the ice warning alarm on the dash came on, which gave me a bit of shock.  I assumed it was  a malfunction but no, the temperature was indeed only 3 degrees Celsius. I'm glad it was warmer because John needed some help in building a new fence and I told him that if it was cold he would be on his own!!!  I make a good labourer even if I say so myself!

My Card


click to enlarge

Usually our little Christmas Card Club post a card every two weeks but in order to fit them all in it was decided to fit in an extra one.  Rather took me by surprise so I had to hurriedly make a card. I had something in my mind but thinking I had an extra week I had to come up with something in rather a hurry.  This time it was Karen B's turn to choose and she chose  poinsettias.  They really are so indicative of Christmas aren't they?  Karen also celebrated her birthday on Friday so Happy Birthday again! 

My card is 5" x 7" and I used the Poinsettia Box Clear stamp by Woodware.  I stamped with Versamark and heat embossed it using Detail Gold embossing powder. I coloured it with Promarkers and then used tiny gold seed beads for the centres. It was matted onto green glitter card, red card and then onto the white base card. A gold bow and gold gems in the corners finished off my quick Christmas card.  This is a very flat card so very mail friendly.

If you are interested in joining our little group please contact me.  It is not a challenge club, we only want to get ahead with our Christmas cards throughout the year so there is no panic in the last few weeks.  If you would just like to see what the other ladies have made you will find their contact details in my right side bar.

Take care and enjoy the rest of the log weekend - particularly you ladies who work and so will really appreciate the extra time off! 

Saturday, 26 April 2014

Christmas Card Club - # 9 - Black, White & One Other Colour.

Good morning to all my friends and fellow blogggers.  It is time once again to feature a card for our happy little club.  This time it was Karen P's choice and she asked us to use black, white and one other colour.  Might sound fairly innocuous but I must say that I really struggled with this one.

My Card

Click to enlarge picture

My card is 7" x 5". I managed the black and white but I struggled with another colour so I kind of cheated and placed a a mat of silver mirri card between the base card and the black mat. I used a CB snowflake embossing folder. I used a Hero Arts snowflake stamp from a set that I have had for many years. I stamped it onto black card with Versamark ink and heat embossed with WOW Opaque Bright White. This was die cut using SB Standard Large Circles and matted onto white card die cut with SB Lacy Circles.  I wanted to add a layer of black ribbon but could only find very narrow opr very broad so I compromised and used a strip of black card.  I die cut a white and a black snowflake from Marianne Creatables Swedish Ice Star snowflakes.  I then just added some diamond gems to the snowflakes to match the silver mat, and added a peel off greeting to finish off.  A fairly simple card but it works for me.


This is one that I made when I was trying to come up with some ideas.  Not brilliant but it can go in the box and I can use it if I run out of cards closer to Christmas.  It's 6" x 4" and like the other one has a mat of silver mirri.  The dot embossed card was in my bit box. I just cut out some bauble shapes free hand from black glitter card and added a little bow to each.  Another peel off greeting, silver to match the mat, to finish.

Hope you are all keeping well.


Entered into: Rudolph Day

Sunday, 1 December 2013

I'm Back for the CCC challenge - Christmas Trees.

Hi everybody! I have missed you all so much! I am still minus my computer unfortunately.  After getting a new hard drive it turned out that wasn't the problem anyway.  John has ordered something else which should come on Monday so we'll see if that's it.  Meanwhile we have downloaded my camera software and photo editing software onto John's laptop so that I can at least do something if he is not using it.  I am also able to plug my external hard drive into his laptop too in order to access my data but it is a very long winded affair.  Anyway, enough of that.

I am so sorry that I have been missing from the visiting and commenting. Hopefully it will not be too much longer now.

My Card


click on image to enlarge picture

The challenge is "Oh Christmas Tree".  Now I don't happen to own a proper Christmas tree stamp. I think I have a digi stamp, but at the time I was doing my card I wasn't able to access my data. Anyway, this is a tree, and it's Christmas, so it will have to do. Hope you agree.

My usual 6 x 6 inch card. The stamps I used are Denami Designs Christmas Script Background and Star Swirl Tree and I have had them for about 9 or 10 years. Now I've used them again I don't know why they were relegated to the drawer! I cut a piece of blue vellum to cover the card front and wrap around the back. I stamped the Script stamp in white onto the vellum and heat embossed with Ranger Frosted Crystal embossing powder and attached it to the card front. Onto a narrow strip of the blue vellum I again stamped the Script stamp, this time with Brilliance Pearlescent Ice Blue and heat embossed with the same powder to give a different effect, although the difference is quite subtle. I embossed a piece of white card stock with Crafts Too embossing folder Snowflakes, wrapped the vellum strip round it, matted it onto silver mirri and attached to the centre. The star swirl tree was stamped with the blue ink and the same embossing powder and matted onto silver mirri. It wouldn't be Christmas without a bit of glitter so I added blue glitter to the star, and a bit of bling to the corners. The picture is not very good I'm afraid. It is quite shadowy where the vellum is loose because I only attached it to the back of the card where it overlapped and underneath the snowflake panel. In real life it looks better. I am really pleased that the embossed script turned out so well.

Well that's it from me. Hope you are all well. I know my friend Sue P is unwell so please get well soon Sue!!!!


Entered into: