Showing posts with label LOTV stamp. Show all posts

Tuesday, 3 May 2016

Two Very Different Angels for CCC

Good morning.  I am very late for my club card this time.  Usually I am a day early and now I am actually two days late.

Card 1


Recipe
6" square card base
red card - Rymans
DP - Papermania - Home For Christmas
Crafts Too snowflake embossing folder
Marvellous Squares die - Spellbinders
Snow flake die - SB Create-a-Flake 4 or 5(was already cut)
Little Ivy stamp - LOTV
sentiment stamp - magazine freebie ages ago
pearls from stash.
Promarkers to colour.

No matter what I did it was impossible to see that the white card at the left side was embossed with snowflakes! Just had to glitter on her wings - all angels need a bit of glitter.

Card 2
 

My second card was computer generated and is one layer.  I was quite pleased with myself that I managed to merge everything and even got the colours to fade.  This will be for a friend who is a devout Roman Catholic and I know this is the only type of Christmas card she would appreciate. Unfortunately there appears to be a line showing through the side of the card which is not on the actual card so perhaps the camera picked up something I'm not aware of.

Well the sun is shining here although it is very nippy still.  Hope you had a good Bank Holiday weekend. 

Take care!


Wednesday, 16 October 2013

Acetate Stepper

Hi! I do not like these misty murky mornings. You know, it has just brought a song to mind that we used to sing at school when I was very young - "One misty, moisty morning when cloudy was the weather, There I met an old man clothed all in leather." Well that's done it for me because I'll be singing that all day now - until something else reminds me of another song!!

My Card


Click on image to enlarge pictures


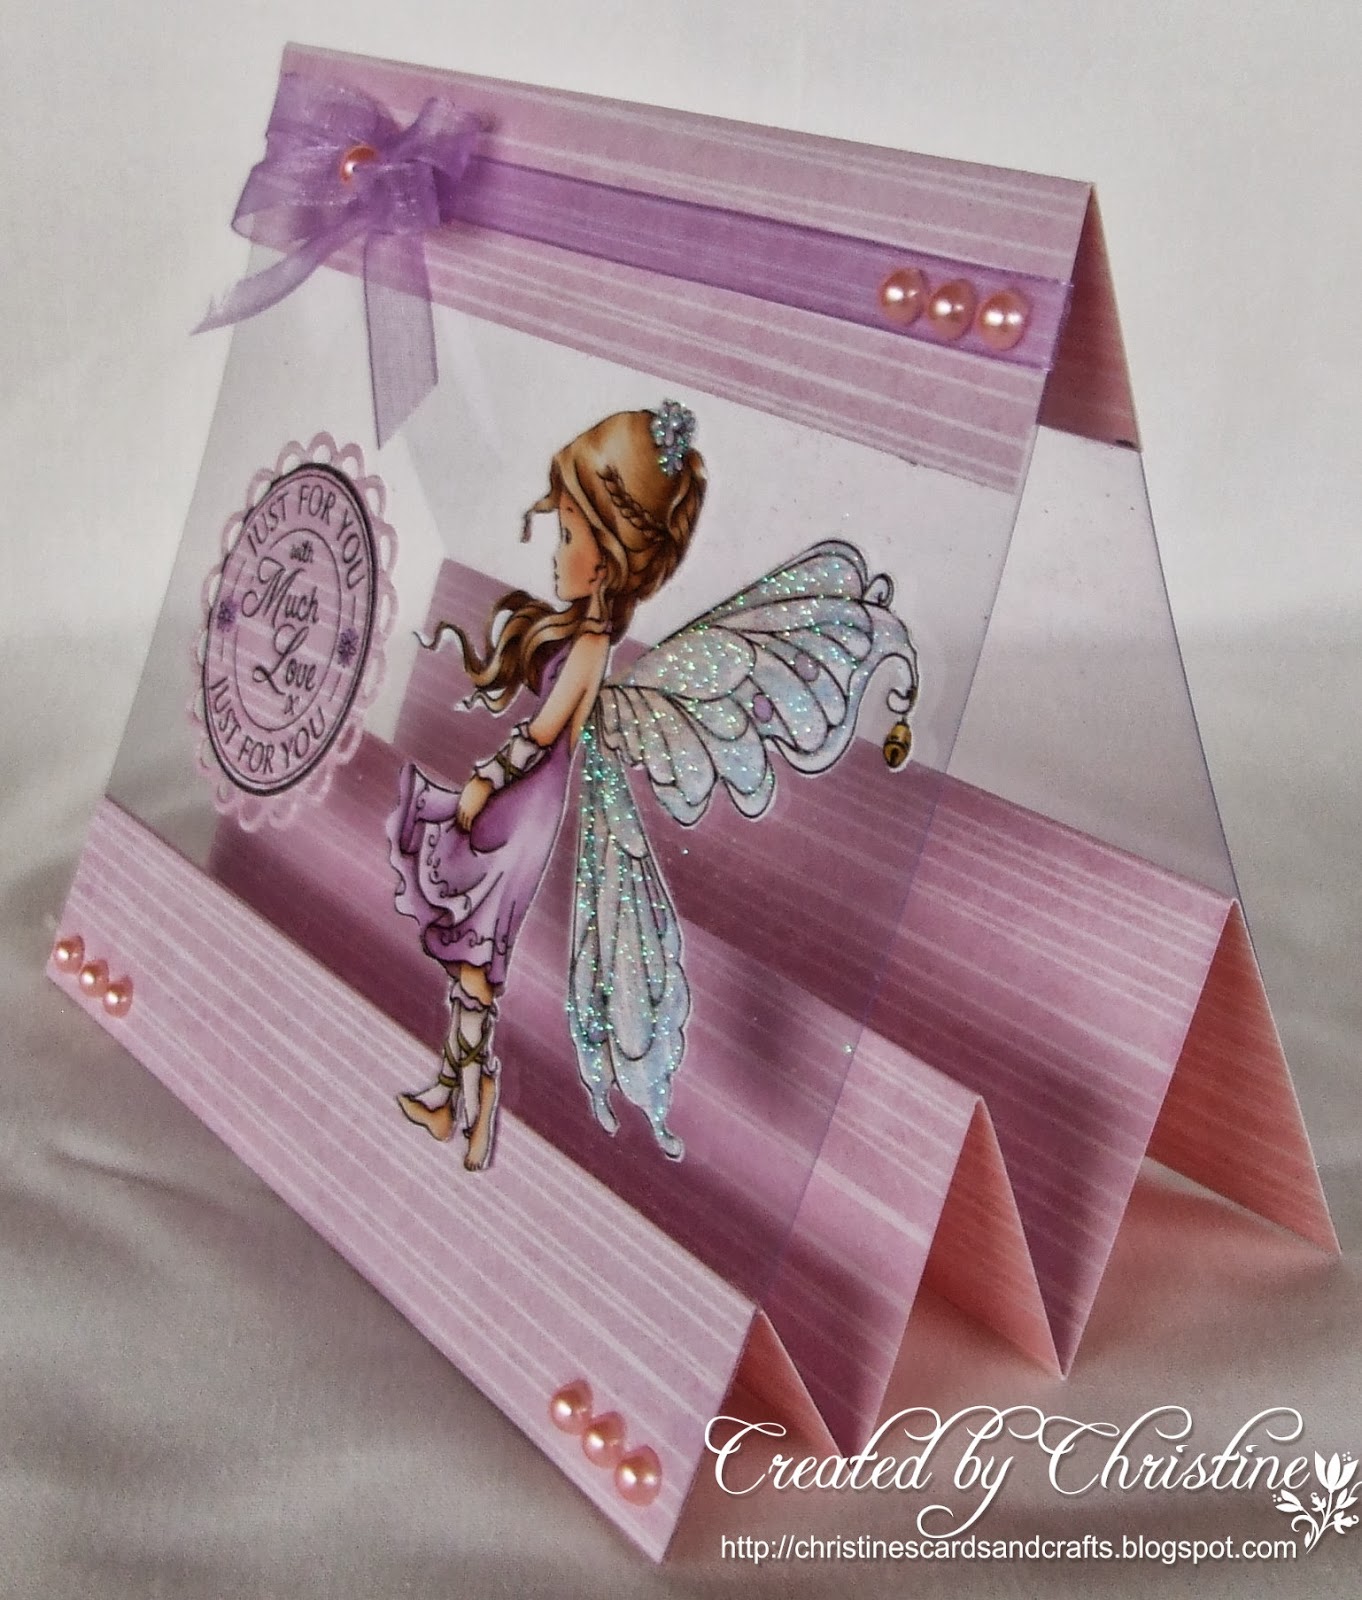
A few months ago on Doreen's blog  (Doreen's Dream) she made a card  using acetate  over it. I liked the idea but never thought any more about it.  Anyway, I came across my thick acetate yesterday and this project came into my mind so thought I would have a go.  I couldn't find her card so I just had to do what I think I remember!

I made a stepper card and then stuck the acetate over it to form a tent shape. I added some more card stock over the fold and across the bottom of the acetate. The image is a topper from Hobby House, using  a Wee image, that I fussy cut after first adding a little more colour with Promarkers and lots of glitter to her wings. The sentiment is LOTV and die cut with SB Lacy Circles. I then just added some ribbon and pearls. I kept it very simple, but it is such an easy card to do that I shall certainly be doing it again and elaborating on it. The pink card stock is from one of the First Edition pads and since it was an offcut  left from another project I don't know which one.

Keep well and warm everybody.


Entered into:

Sunday, 8 September 2013

Criss Cross Christmas Card for the Christmas Card Club Challenge.

Hi! I love alliteration so I couldn't resist this title!  I wonder if I could say it after a couple of glasses of wine!!   Lol!  I actually started this card two weeks ago  for "Anything Goes" challenge then I realised that it fit nicely with this week's "Let's Go Monochrome", which was chosen by Clare, so I put it to one side and picked it up again the other day and finished it for today's challenge.

My Card

 click on image to enlarge pictures
insert

My card is made from two 6 x 6 inch cards stuck together and trimmed.   The papers are Dovecraft "Winter Wonderland" which I have had for years.  My image is an LOTV stamp which  I think  is called Little Ivy. I coloured her with Promarkers, die cut it with SB Standard Circles Large and matted it with SB Petite Scalloped Circles Large. Whilst it was still in the die I added some Versamark Smoke Blue to take away the stark white and let it blend in a little more. I added lots of glitter to her wings and the poinsettias. Well it's for Christmas so glitter is obligatory!! The flower, from WOC, started out white but I coloured them with Promarkers. The Holly Vine is from Memory Box and I cut it three times, chopping one of them up and sticking it around the flowers. I cannot tell you where the stamp is from - it was one of the ones I took off the wood block and forgot to take the details! The pearls are from my stash.

Yesterday Patricia was telling us how she got so involved with her crafting that she was late making dinner - only to find she was an hour early!!  A few years ago I had a real blonde moment!  My sisters are married to cousins who have birthdays on the 10th and 14th October. I was horrified when I realised that I had missed both of them but amazed that my elder sister hadn't rung to complain - she's not normally one to hold back.  I hurriedly made two belated cards and posted them - only to find it was only September and I had looked at the wrong page of the calendar! Whoops!!

Anyway, I hope you all enjoy the rest of the weekend.  We had a beautiful day yesterday after a chilly start. Still no rain and I'm dancing as hard as I can Jenny! Lol!


Entered into :

Friday, 8 February 2013

We Are Special

Hi everybody! I've had quite a busy week and so not a lot of time for crafting. Well, that's not strictly true.I have been playing around with a few things, different techniques etc but not actually made a finished project.  However, I have managed a card today. I'm not quite sure what happened here, but I started  out to make  a Christening card which is why it is  pink and white. So much for that! Ah well, I have time enough for that later.

My card
Click on image to enlarge picture

The card is white pearlescent  6x6. I used Martha Stewart Trellis Border punch and cut four lengths from the same white card then mitred the corners to make a frame which I  matted onto pale pink card, then  onto darker pink and finally onto the pale pink again before attaching it all to the base card. Using Spellbinders Classic Squares Large I diecut a frame from the dark pink card and attached it to the centre. I diecut a SB Labels 16 from the white pearlescent card and whilst it was still in the frame I  sponged it with pink ink. It doesn't show in the picture but looks fine in real life. I then stamped the LOTV sentiment in black Memento ink and attached it with foam pads.  The lace, ribbon and pearls are all from my stash. The ribbon is a perfect match for the dark pink card - more luck than judgement I think!

Well that's all from me today. I hope you are all looking forward to a relaxing  weekend - particularly you ladies who work! 

Love and hugs from Christine xx

Tuesday, 8 January 2013

Gift For The Bride

Hi

Still cannot find my mojo!


Click on image to enlarge picture

When my nephew was married my sister was looking for something that her grandson could give to the bride. Poor Sébastien was feeling very left out - his dad was best man and his sister was bridesmaid! In his words  he was going to be "the most least important person there"!  We all had a good laugh at his phraseology.  Anyway she looked everywhere but couldn't find anything she really liked, or of a reasonable quality - most of the stuff in the shops seemed to be quite shoddy and she isn't in to technology and doesn't have a computer so wasn't able to go online. She was looking for something other than a horseshoe. So big sister saved the day!

 I bought a cheap wooden spoon and embellished  it. I wound white satin ribbon all round the handle and then added lace, ribbon, flowers and pearls all of which were in my stash, so it was a very cheap but very personal gift.  I decorated both sides and on the reverse put the names of the bridal couple and their wedding date. I computer generated the details onto Letraset Safmat so that when it was applied to the back of the spoon it looked as if it was actually on the spoon itself.  If you haven't tried Safmat it really is excellent.

Again I didn't photograph it but Jeanie did - maybe not not how I would have done it but it does give you an idea of what it was like and at least it was actually captured on film.  Séb then felt very special when he had his photograph taken handing it to the bride!  You've got to keep the children happy !!


I made a box for it and embellished it using Spellbinders Parisian Accents and lined it with batting or wadding or whatever it is called - anyway, it's the stuff you use for quilting. The sentiment was an LOTV stamp. I was actually quite pleased with how the spoon turned out since I really had no idea what I was going to do and just kept adding bits.

Have a good day everybody and hope you find time to fit in some crafting.

Love from Christine xx


Friday, 4 January 2013

Wedding Day

Hi Crafty Friends!

I have been playing around for the last few days but so far have not actually come up with a finished item.

Just in case you think  that I have left the country I decided  to post a card I made before I started my blog. I have a few cards that I made when my nephew was married so I will slip one in every now and again.


Click on image to enlarge pictures


The card is 8x8. The backing paper is from a HOTP wedding pad that I have had for a few years and which has some lovely designs in very subtle shades of pink, green and grey. I used a large LOTV diecut topper for the main image and an LOTV stamp for the sentiment, die cut with Spellbinders lacy circles. The ribbon and lace was from the Ribbon Box if I remember correctly. The pearls and  little silver heart charm were from my stash.  For the box I used  a slightly smaller  diecut topper and a different LOTV sentiment.

The pictures are not very good but I forgot to photograph them before sending them to my sister so she very kindly took some pics of these and the others that I will be showing later. Thanks Jeanie!!

Well I hope that my mojo will soon make a return appearance! Until then, I hope you all have a great  and productive day.

Love and hugs from Christine xx

Wednesday, 19 September 2012

Peaches and Cream

Good morning friends. Hope everybody is well today.


Click on image to enlarge.

Unusually for me my card is 8x8 inches. Usually I tend to use this size only  if it's something special. However, the background paper from Websters Pages is 6x6 and I didn't want to cut it because it is so pretty. I layered   it onto cream and then peach coloured card which I sewed together with a zig zag stitch and than attached them to  cream card.

I stamped the message onto cream card stock, die cut with Spellbinders ovals and then layered it onto the second size Floral ovals  in peach card, trimmed with pearls. The flowers are WOC and the swirls are Marianne Creatables. The ribbon, lace and pearls are from my stash. I thought it turned out to be quite pretty. Although it can be tempting to fill all the space I resisted, so the pretty paper is visible.

Well that's all for today. Hopefully I shall be back tomorrow.

With love from Christine xx

I am entering this in http://ladybugcrafts.blogspot.co.uk/ Anything Goes; http://disdigidesignschallenge.blogspot.co.uk/2012/09/use-more-than-1-die-cut-or-punch.html, Use more than one   diecut or punch. http://myheartpiecesdigitalstampchallenge.blogspot.in/ Anything Goes


      Thank you for all your lovely comments. I appreciate each and every one of them.