Showing posts with label Martha Stewart. Show all posts

Saturday, 12 May 2018

Sentiment As Focus for Christmas Card Club

Goo d morning to you all and thanks for dropping by.  I can't believe how quickly these two weeks pass and now it's time for our next challenge in the Christmas Card Club.  Carol is hosting this this time and she wants us to use the sentiment as the focus of our card.  Suits me down to the ground.

My Card


Recipe
5" x 7" white base card
white card stock - Rymans
pearlescent card stock - Jelly Bean Crafts
embossing folder - Chain Link from Couture Creations
die - Sue Wilson
bottom edge -Martha Stewart Cherish punch 

I decided to use a non-Christmas embossing folder for a change.  I think it looks quite masculine which is a bonus since I send a few to males on their own.

This card is not due until tomorrow but I have a DT card to post then so whenever possible I try to post this one a day early.  

Hope you enjoy the weekend, though I think the weather has changed now.

Take care.


Sunday, 6 August 2017

Bags and Boxes for International Art and Soul

Hi, I'm back again.  This time I am showing a box I made for IAAS.  This is another one I had in my stash which I hadn't even photographed.  I really must start making use of these boxes.

Please scroll down to previous post for my Christmas Card Club card.

My Project


Recipe
Cream cardstock - WH Smith
Paper - Webster's Pages
Punched edge - Martha Stewart Punch Around the Page
Flowers - Wild Orchid Crafts

This box is 2 inches deep and 4 inches square so it will hold quite a reasonable sized gift.  Or quite few choccies!!  

Unfortunately the names of the MS punches are on the boxes but not the punches and the boxes have long since been dispatched to the recycler so I don't know the name of them.

Pleas pop over to the challenge blog and see what the rest of the design team have come up with.

Well yesterday we had some sunshine but a rather mixed day overall.  I think we are about to have some pretty rough weather - but after all it's summer so what can you expect ...lol  ?

Take care and enjoy your day.

Tuesday, 3 November 2015

Get Creative Challenges - Birthday Celebrations.

Good morning everybody and hope you are well.

Get Creatives Challenges  is now one year old! We would love you to play along  and celebrate our birthday with us.   Our sponsor is Polkadoodles  and all you have to do is make a card that celebrates a birthday.  What could be more simple?

My Card


Recipe
Card base 6" x 6" made from Papermania card stock
Design paper - Lucy Cromwell by Papermania
Pearlescent card stock - Create and Craft  (from Wilkinsons)
Image and sentiment - both from Polkadoodles
Lacy Circles die - Spellbinders
Doily Border Punch - Martha Stewart 
Promarkers to colour
Pearls from stash

Well that's my fourth card in a row which I haven't managed for quite a while.  I think I need to go and lie down in a dark room now ... lol!

We would love you to join in with our birthday celebrations and we have prizes from Polkadoodles and also Angies Digis.

Must go now.  Take care.


Sunday, 26 July 2015

OSAAT #242 Anything Goes .... With Children

Good afternoon.  I'm here with my card for One Stitch At A Time.  The challenge is Anything Goes .... With Children".  I am using Playful Puppy from Reeces Scrap Pieces, one of the designers at Stitchy Bears Digital Stamp Outlet, and can be found here.  It includes a digi image and four papers.  For my project this time I decided to make a mini pizza box.

My Project


Box made from The Range cardstock
Brown  card - Bazzill Basics
PATP Cherish punch - Martha Stewart 
Lacy Circle die - Spellbinders
Playful Puppy - Reeces Scrap pieces
Card Candi - Craftwork Cards
Doggie button - from stash
Promarkers

The mini pizza box is 10cms square. I lined it with one of the papers in the set and matted the sides of the box with another of the papers. Just right to fill with some of the goodies children seem to love.

We would love you to join us in our challenge this time.  Here is the prize you could win.

July Prize Pack


Well that's all for today.  Take care.


Sunday, 5 April 2015

OSAAT # 234 - Anything Goes for Easter

Good afternoon  I'm sorry for my absence but right now there is a lot going on here.  When I can I try to check up on your blogs but it is a bit sporadic I'm afraid.

This is my DT card for the  One Stitch at A Time  challenge and this time it is to make a card for Easter or Passover.  My image is the Cala Lily Digital Image and Paper Pack from Coosty Creations available here at Stitchy Bear Digital Outlet.

My Card


Recipe
6x6" card made from Papermania cardstock
Papers from Coosty Creations
Tiny pearls from Meiflower
Large pearls from Hobby House
Martha Stewart Scroll Lace Punch

I actually didn't use the digi image.  The cala lily image I used as a topper on the front of my card is actually part of one of the backing papers which I cropped and printed onto card stock.  I also used that paper to line inside the card which made a lovely finishing touch. Although it's not very clear in the picture I also used another of the papers on the front. I didn't want to spoil it by adding any text so I computer generated the text on to white card stock and cut it into a label/tag which can be pulled out to read. I trimmed the edges with the MS punch to match the backing paper.

We'd love you to play along with us.  This is the prize you could win.


Hope you are all well and enjoying a blessed and peaceful Easter.


Wednesday, 3 December 2014

Accordion File

Good morning to you all.  Just a quick post today.   About a month ago I bought the Big Score Board from Crafters Companion. This was one of the projects on the CD - ROM that came with the board.

My Project


I used double sided A3 card from Crafter's Companion, together with white centura pearl for the inserts and embellishments. I used a Martha Stewart punch for the edge and SB Parisian Accents and SB Foliage around the Wild Orchid Crafts flowers.  The lace,  ribbon and pearls are from my stash.

I have decided to fill it with some cards and include it with my sister's Christmas gifts.  I often end up making cards for her and having to post them.  This way she will have a little stash ready to hand.

Hope you are all well.  We are off to Cheltenham to do some shopping in an hour or so.  My first Christmas shopping trip and I want to get it all done.  Luckily some of my gifts are "money - bigger kids seem to like that and it suits me!!  I do have one or two gifts though. Thick fost and fog so that country road trip is going to be challenging to say the least.  This is the main reason I 'm glad I no longer work in Cheltenham - summer was lovely but winter was a pain!

Take care.


Thursday, 2 January 2014

Pink Origami Flapbox

Hello dear friends and fellow bloggers, and a Happy New Year to you all.  For many of us last year was rather trying, to say the least, so I hope for a happy and healthy 2014 for us all!

My mojo is still on holiday I think.  I spent ages in my craft room yesterday and all I managed to do was break the handle on my Grand Calibur!!  However my fairy godfather (aka John!)  has managed to fix it but I will have to be careful from now.

I made various little boxes coming up to Christmas so that I would have something available should we have unexpected visitors.  Since I didn't use them all, and since I didn't use Christmas papers on them,  I now have some little stockpiled gifts.  I will keep popping them onto the blog.

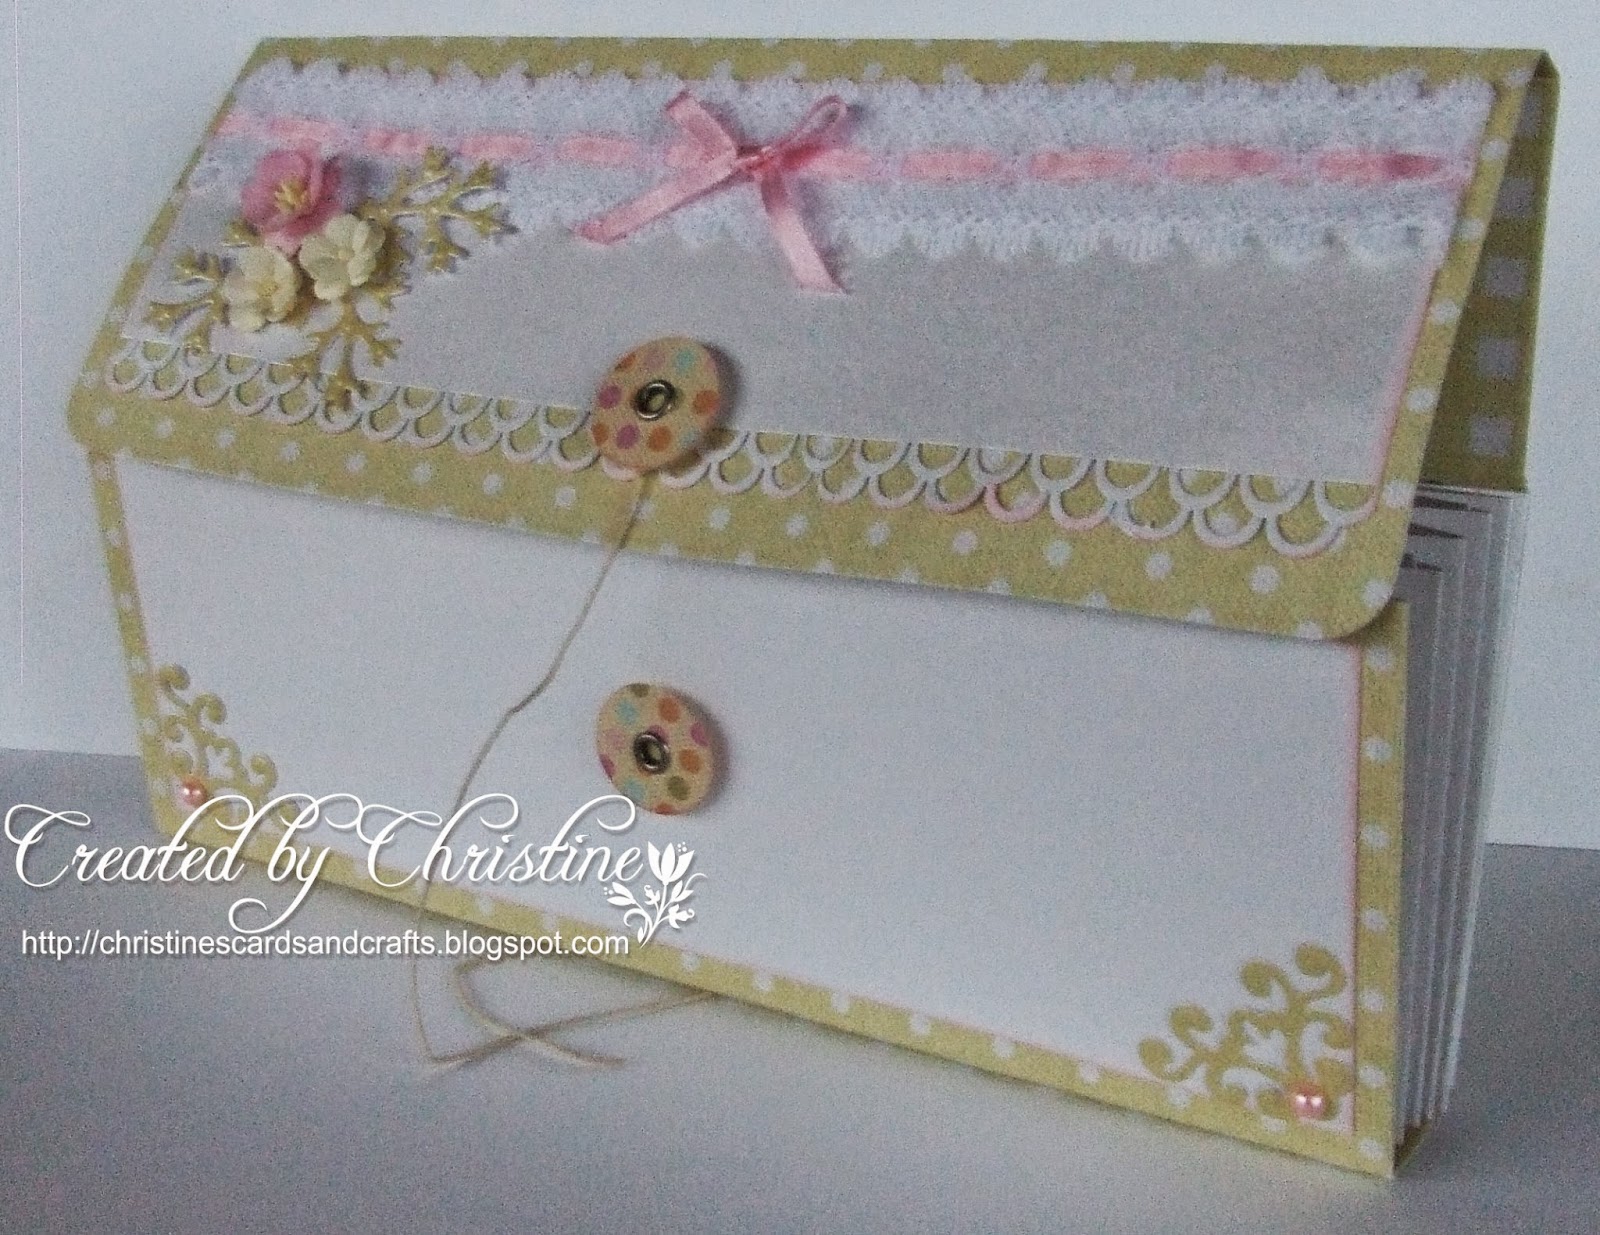
This one is a flap box and I made quite a lot of these last Easter and put some mini chocolate eggs in, but they will hold all sorts of things from chocolates to small gifts.

This is picture heavy I'm afraid.

My Project

Flap box complete with belly band

Two views of the decorated belly band

 
 Very plain without the band
 
Another view of the completed box

You don't actually need a belly band because one side of the top slips inside the other for closure. The band is purely decorative.  I cut it from ivory card stock and trimmed Martha Stewart punch and added a  length of spotted grosgrain.  I cut one pink and one ivory SB large Venetian motifs and Cheery Lynn Wreath Strip leaves. A few pearls finished it.  I forgot to take a picture of the open box but if you check out the tutorial you will see it there. It is made from one piece of 12 x 12 cardstock and the space inside measures 4 x4 inches square and the depth is approximately 1½inches.  
                      
You can find the tutorial  HERE on Becca Feekin's "Amazing Paper Grace".  If you are not familiar with her work you are missing a treat.

Well that's it for today.


Thursday, 19 December 2013

More Candles

Good afternoon  everybody and thank you for dropping by.  I have had rather a busy week but some of it, I  must confess, was socializing and very enjoyable.  On Monday I met up with some friends for coffee.  We decided it should be just coffee because we were all busy and didn't have time for lunch.  Turns out lunch might have been the shorter option!!

Yesterday I met up with my ex-colleagues and had lunch.  I made some more candles - but typically I had wrapped two of them before I remembered I hadn't taken pictures.  Too late was the cry because there was no way I was going to undo the cellophane wrapping! So here the pictures of the other two.

My Project


Click on image to enlarge pictures
(Wonky candle corrected before wrapping!)


For the first candle I stamped a Barbara Grey stamp  "The Night Before Christmas" and coloured with Promarkers before heating it onto the candle. The snowflake, and a few others scattered around the back, clear peel offs which will easily peel off before the candle is lighted. "The Night Before Christmas" ribbon was from Crafty Ribbons.

The second one was obviously LOTV "Little Ivy".  I used an MS punch on the purple card stock, wrapped some white striped organza ribbon round and then finished off with a lavender silk poinsettia which has been in my stash for a few years, and finally a pearly flower in the centre.

I could kick myself because I bought a pack of plain carrier bags from Hobbycraft to decorate and I don't know where I have put them. I had to filch some extra large manila envelopes from John's office. I made them into gift bags and decorated them with papers from Simple Stories "Handmade Holiday" pad and more poinsettias and holly.  But yes, you've guessed it - forgot to photograph them!

Anyway my tree is finally up and finished so I think I can now calm down and take it easy!  Hope you are all progressing well with your Christmas preparations.


Thursday, 10 October 2013

Christmas Card Club - Upcycle

Hello my dear friends and blogging companions.  I am so sorry for my absence.  This card was due on Sunday and though I knew it was going to be late I was hoping I could do it in time for Monday.  Unfortunately my friend lost her mum suddenly on Sunday  and was devastated.  I know exactly how that feels because that is just what happened with my mum, so I have spent quite a bit of time with her offering what little comfort I could.  I made her a sympathy card but then forgot to take a picture before I gave it to her. Typical!

Anyway back to this particular card. This time it was Maureen's choice (aka Scrappy Mo) and she asked that we upcycle an item onto our card.

My Card


Click on image to enlarge picture
When I receive a card that is too nice to just throw away I either keep the card or I take off the bits that I like, the idea being to use them on my own cards. However that rarely happens - but the intention is there!  So this time I rescued a card front that I took from a Christmas card years ago.  I die cut  this sweet little angel using SB Classic Ovals and then matted it with some red card die cut from SB Classic Scalloped Ovals.  Would you believe there was no glitter on my lovely angel?  Well, I soon corrected  that omission. Lol! The candles and baubles border along the top was printed from one of my Greeting Card  programmes, but I can't remember which one. I used an MS punch on it.   A little bow and some pearls finished it off. It wasn't until I took the picture that I realised I hadn't put a sentiment on so I will think about that, but it doesn't look too bad without it.  What a block head!  I am trying to keep my cards pretty flat this year to avoid huge postal charges.

Well that's all for today. Hopefully I can get back to some more regular posts now.  I apologise for not visiting you over the last few days but I will rectify that today. I hope this finds you all keeping well.


Wednesday, 25 September 2013

Eazy Pizzy

Hello friends. After yesterdays' foggy start it turned out to be a gorgeous day, and the same again today.   Started out very foggy again, in fact it was still dark at 6:45.  I guess the light just couldn't break through the fog. But  the sun  definitely came through eventually, which is just what we need, otherwise the winter will seem very long.  So another lovely day. We are being spoiled.

 Just back from the hospital. Fortunately there wasn't too much of a delay so John didn't get too uptight today. Flippin' men!!

My Project

More boxes again today
 click on image to enlarge pictures


 I have made two mini pizza boxes.  They are exactly the same size, 4 inches square and 1 inch deep, but look so different.  I left the first one very plain and used purple striped card stock. I made a band to go round the middle which just slides off.   The centre band really transforms what is a very plain box.  I die cut the largest die from SB Venetian Motifs and then made the purple and white aster from SB HeartFelt Creations Delicate Asters. 

The second one I cut from ivory card stock and then used Martha Stewart PATP Cherish punches to make the top and bottom.   I added an old LOTV topper which has been in my stash since forever, and then just added some pearls, poinsettias and Cheery Lynn Flourish leaves which were in the drawer with the other ready cut  stuff.

I really love these little boxes.  They are the simplest boxes to make and yet can look so different depending how you decorate them.   I also like the way the lid is attached to the base.  For this size you only need a piece of card 6" x 11".  I have adjusted the measurements and made bigger ones and deeper ones in the past so they are pretty versatile.  However, I have only ever made square ones.  My next task will be a rectangular box.


Thursday, 1 August 2013

Gift Box

Good morning. I know I haven't been posting but I have been rather busy all the same. I am going up north to visit my sister at the weekend and it is her granddaughter's birthday in a few weeks. Charlotte is very exciting at the prospect of becoming a teenager at last. I have been making cards for my sister, my nephew and myself so that I can take them up at the weekend and not worry about putting them in the mail. I cannot post them on my blog until after Charlotte's birthday because she visits my blog at times.

When I was in Sainsbury's last week they were selling their candles etc at half price so I bought a few boxes so that I could use them as little gifts and make pretty boxes for them.

My Card


These little scented votives are Primrose and Peony so I picked up the two colours and made the box. They smell absolute gorgeous! I cut an oval from the lid, added SB Floral Ovals to the front and a piece of acetate behind. The corners are Cuttlebug and the border round the edge is Martha Stewart Doily Lace border. The flowers are all Wild Orchid Crafts and I coloured them with Promarkers so they matched and then added some leaves from Cheery Lynn. I finished with some Dovecraft scalloped ribbon and added some pearls. 

I was going to post a card today but I can pop that on tomorrow instead. 

Have a good day. It's going to be hot again!!

Love and hugs from Christine xx

Saturday, 20 July 2013

Garden Of Friends

Good afternoon friends and fellow bloggers.  Since I got back from holiday I haven't really felt like crafting.  Mr Mojo is still in West Wales I think. I hope he returns soon!  Yesterday, although it was still terribly hot, we had a very slight breeze so it was a bit more bearable.  I think it is the humidity that is so wearing and tiring. A dry heat is much easier to cope with.  I actually found the most comfortable spot was sitting under the carport. Fortunately we have no neighbours or they would have thought I was bonkers.  We have even moved downstairs into the guest room temporarily because it is cooler there.  Today is much more comfortable because it is quite breezy.

Before I go any further I would like to say hello and welcome to my latest follower Debbie.  I hope you enjoy what you see here. If you leave a comment than I can visit you in return.

My Card


Click on image to enlarge picture

My card today is 6 x 6". I matted some red card stock onto the base card and then ran another piece of white card through the GC using the Dainty Dots folder. I wanted to double mat my stamped image but it would have been too big for the card. Instead I used a technique that I picked up from Becca Feekin's Amazing Paper Grace blog and inked the borders on both die cuts. After inking I then stamped my image and sentiment, and coloured with Promarkers. I must admit it looks fantastic, as if there really is another die cut there. You can find a video tutorial here.  (For some reason the link is not showing up on the post, although it does in the draft. It is there if you just hover your mouse over the space before the bracket.) I think this is a technique that I might well be using often.  Becca prefers to stamp and diecut the image and then ink the border, but I got into bit of a mess that way and kept smudging it, so I I inked the die, cut and embossed it and then stamped the image afterwards. I love the way it looks. My image and sentiment are from JustRite Stamps "Poppies" and die cut with SB Labels 10.  The sentiment was diecut with SB Labels 16.  I cut a length of red card and punched both long edges with  Martha Stewart Scroll Lace punch which I then wrapped with  white ribbon and tied a double bow. This is a length of ribbon that I bought a couple of years ago and "misplaced". I came across it in a drawer in the lounge - obviously got picked up with something else! The tiny poppy in the corner was one cut from the image I spoiled and then I just added some red pearls from my stash to finish.

Well I hope you all enjoy the rest of the weekend. I'm having a quiet week because John is up in Scotland climbing mountains. I'm always relieved in the evening when I get the call that he is safely down.

Love and hugs from Christine xx

Challenges
http://anythingchallenge.blogspot.co.uk/2013/07/anything-goes-97.html
http://ilovepromarkers.blogspot.co.uk/2013/07/challenge-177-anything-goes.html
http://oldiebutagoodiechallenge.blogspot.co.uk/2013/07/in-garden.html
http://dutchdare-cardchallenges.blogspot.co.uk/2013/07/226-floral-frenzy-day-for-daisies.html

Wednesday, 13 February 2013

Just Because

Hi friends and fellow bloggers! Well at last it looks as if the snow is starting to thaw. Thank goodness!

My Card

Click on image to enlarge picture

My card today 5 x 7 inch and made from cream hammered cardstock. My Martha Stewart trellis border punch was still on my desk from the other day so I thought I would use it again. This time I did actually use it like the trellis above the garden fence and put flowers, leaves and butterflies around it. The flowers are from Spellbinders Rose Creations, the leaves are SB Foliage and the butterflies from SB Jewel Flowers and Flourishes. The sentiment is JustRite Grand Sentiments.  I love this set of stamps because there are so many very useful sentiments. Finally I then  added some pearls which I coloured with Promarkers. Nice and simple.

Well that's it for today. Hope you all enjoy the rest of your day.

Love and hugs from Christine. xx

Sunday, 10 February 2013

Thinking Of You

Hello dear blog friends. I am more than ready for Winter to take a hike and allow Spring to come in. I'm getting really tired of the snow! Fortunately the rain took it's place over night and most of the snow has gone but I think more is forecast. I have been to my Zumba class this morning and oh boy did she work the upper arms!! Aching or what?

My Card
Click on image to enlarge picture

Today's card is for my friend whose mum is very ill in hospital and thought I would just drop her a card. It had to be a quick make so I settled for a CAS card. The card is my usual 6x6 and matted with yellow pearlescent cardstock.  I then used a Martha Stewart punch - I think it's Lace Doily Edge punch - on two pieces of white and one piece of yellow and lined them up. The stamp is from JustRite stamps Grand Sentiments - not quite straight! You see, you are not the only one Patricia!!! The  flowers are actually Medium Rose and Miniature Rose from Cheery Lynne, and by just using two flowers on each I think they resemble daisies.. I always admire the corner dies that Jacqui uses  (http://jacquibourne7.blogspot.co.uk/)
so I bought the Cheery Lynn Lace Corner Deco Die C.  They are all so pretty that it was difficult to make a choice. I'm sure I'll be getting more at some point!! Lemon ribbon and pearls from my stash finished it off and it was ready for John to pop it through the letterbox as he passes shortly.

I hope you all enjoy the rest of the weekend.

Love and hugs from Christine xx

Friday, 8 February 2013

We Are Special

Hi everybody! I've had quite a busy week and so not a lot of time for crafting. Well, that's not strictly true.I have been playing around with a few things, different techniques etc but not actually made a finished project.  However, I have managed a card today. I'm not quite sure what happened here, but I started  out to make  a Christening card which is why it is  pink and white. So much for that! Ah well, I have time enough for that later.

My card
Click on image to enlarge picture

The card is white pearlescent  6x6. I used Martha Stewart Trellis Border punch and cut four lengths from the same white card then mitred the corners to make a frame which I  matted onto pale pink card, then  onto darker pink and finally onto the pale pink again before attaching it all to the base card. Using Spellbinders Classic Squares Large I diecut a frame from the dark pink card and attached it to the centre. I diecut a SB Labels 16 from the white pearlescent card and whilst it was still in the frame I  sponged it with pink ink. It doesn't show in the picture but looks fine in real life. I then stamped the LOTV sentiment in black Memento ink and attached it with foam pads.  The lace, ribbon and pearls are all from my stash. The ribbon is a perfect match for the dark pink card - more luck than judgement I think!

Well that's all from me today. I hope you are all looking forward to a relaxing  weekend - particularly you ladies who work! 

Love and hugs from Christine xx

Thursday, 29 November 2012

Daisy Chain

Hi blog friends! Sorry I've been missing for a few days. Over the weekend I came down with a virus which really knocked me for a six! A couple of weeks ago I had a sore throat and felt a bit under the weather but that only lasted a day or so then I was absolutely fine. However, I think it hid away in my system and re-emerged last Friday evening - with a vengeance! Over the last couple of days I have been feeling  much better and got cracking on my Christmas cards. They are fairly simple fortunately and I have managed to get about 35 done. Still a long way to go but now I know what I'm doing I can really get my skates on. I actually work better under a bit of pressure!  Yesterday I started on my Christmas shopping. Okay, I know you've probably all just about finished, but hey, I'll get there!  I must confess I was pretty shattered when I got back from Milton Keynes!

Anyway I decided to have a  break from Christmas and make a 40th birthday card for my niece.


I have actually made an A5 card, which I haven't done for ages. I used Spellbinders M-Bossibilties Lovely Lattice for the background and trimmed the bottom edge with Martha Stewart Doily Lace. The main image is Marianne Creatables. The flowers and butterflies are Spellbinders Jewel Flowers & Flourishes with a few little lemon Prima daisies, and the leaves are Spellbinders Foliage. The centres of the large daisies were in my stash - I'm almost sure they were in with a box of Floradoodles that I got years ago.

Well that's it for today. I'd better get back to my Christmas card list!!!

I hope everybody has a good day today!  Love and hugs from Christine xx

Friday, 2 November 2012

The Happy Couple

As I said, I have been so busy and not much time to craft  - sob! sob!  I made this card a couple of months ago but haven't shown it so I thought this was a good opportunity.

Click on image to enlarge picture.


It is actually a stepper card but unfortunately I had to scan it rather than photograph it so you cannot see the step effect. I used white card stock to cut the stepper base using my hougie board, and matted it with pink pearlescent paper. The pink backing papers are from a  wedding scrapbook pad, which I think might be Hot Off The Press. There are some very pretty green papers in it which I will be using at some stage because they don't look like wedding papers. The image is an LOTV topper with some glitter added to the flowers and the brides gown, although not visible, Spellbinders lacy circle and two layers of pink pearlescent card using Martha Stewart  double loop punch. The flowers, pearls and ribbon are from my stash.

My new printer came yesterday so it is all set up and ready to go. Here's hoping that it serves me as well as my last one which I had for eleven years with no problems at all. Mind you, nothing is made to last these days so it's doubtful!

Well have a good day everyone.  Christine xx


Saturday, 27 October 2012

My First Tag

Morning everybody.  Hopefully this will go out at the right time. I always schedule my post the day before, but this is the first time I have done it two days ahead. Friday will be a very long day and I don't want to mess around when I get home.

I decided that it was time to make a tag - so here it is.


Click on image to enlarge picture.

The size is 15.5 x 9 cms. My initial thought was to make a tag for a man which is why I chose this colour. I stamped a music background stamp in Versamark and heat embossed with clear powder. You cannot actually see that unless you enlarge it. Somewhere along the way - and I really have no idea how - it developed into a  lady's tag. It is double sided cardstock so I used the reverse to add a strip to the bottom and to diecut the butterflies. I used a  Martha Stewart punch for the bottom. Then it was just a little ribbon and lace, some silk flowers held together with a gemstone brad, and a few gems.  Maybe next time I'll manage a man's tag.

Well, have a great weekend everybody.

Love from Christine xx


Saturday, 20 October 2012

Happiness

Good morning blog friends

Had a nice day out yesterday at a National Trust property near Worcester, and once again we were so lucky with the weather. We were about 15 minutes into the drive home when the rain started. I'm glad it held off until then because there was some lovely parkland to  walk around and  I wouldn't have wanted to miss that.

So to my card. I bought this set of dies a little while ago and haven't got round to using them until now. Criminal!  The problem is  there are so many gorgeous dies aren't there?  Mind  you, I have my birthday, wedding anniversary (the big 40 one!) and Christmas coming up, all in the space of six weeks, so that should be worth quite a few dies wouldn't you agree? There are so many that I would just love to own, and it is very easy to get carried away!

Click on image to enlarge picture

Anyway, I'm talking about the Spellbinders Jewel Flowers and Flourishes die, which contain a couple of pretty little butterflies as well.  I also used the trellis die and backed it with lemon pearlescent card which I then used to diecut three of the smaller flowers. I finished off the bottom edge with a Martha Stewart edge punch but I can't remember the name.  I used one of my famous quotes on Labels 18 die. I embossed the flowers and they came up beautifully, but then I used a large ball embossing tool to make them curl so lost it all. I popped a pearl in the centres of the flowers and  used tiny yellow gems on the butterfly's body. I don't usually mix gems and pearls but had no tiny yellow pearls, but they don't look too bad. If I can get hold of some tiny yellow pearls I will do a swap.

I had to use the flash again on my picture because I didn't get round to taking the photo until we got back home and by then the sky was very dark and cloud laden, so it doesn't  look too great.

Well, I hope you all enjoy the start to the weekend.

With love from Christine xx

Thank you for your visit to my blog and for the lovely comments you leave. I really do appreciate each and every one of them, and if you want to leave some constructive criticism then please do so!