Wednesday, 30 October 2013

Krafty Christmas

Hello again.  Nice to have you visit today. Oh my goodness it is so cold this morning. I don't like to see ice on the windscreen this early!! Brrr!

Well time is marching on and I still have lots of Christmas cards to make so I decided to try  some very quick ones.

My Card


Click on image to enlarge picture

This is a 5 x 7 inch Kraft card made from Papermania card stock. I used a piece of LOTV  Krafty Christmas paper pad and a piece from "Handmade Holiday " by Simple Stories with some sticky ribbon to cover the join. I then just added a Marianne Creatables Swedish snowflake, and  Memory Box Frosty Border, both of which were sitting in my die cuts drawer.  The tree die cuts have been hanging around for about 9 or 10 years. I bought them from Lakeland so that my mum could make some simple Christmas cards at the time. A few pearls from Hobby House finished it off.

That is one extremely quick card, so there will definitely more to come, in a similar vein. I had never used kraft card until earlier this year when one of the challenges in our little Christmas Card Club was to use kraft card. I really struggled with it then, but in fact now I quite like it, so thanks to Clare for pushing me in this direction!

Hope this finds everybody well. Keep warm if it is cold where you are.


Tuesday, 29 October 2013

Addendum to Tissue Box Cover

Hi

A few people have asked about a tutorial for the tissue box I posted earlier this morning.  I'm so sorry that I didn't think to add it at the time.  I was going to edit my first post but then I thought that if you have visited once you may not return so this is is a very quick post with the link.  I'm sure there are loads of tutorials on the internet but I am a great fan of Split Coast Stampers which is where I got this one.  If you have never visited it would be worth your while because they really are a valuable resource.  Just be aware that you will need to alter the measurements because as I said earlier tissue boxes are all different sizes.  I have four boxes in various rooms in the house - only two are the same size!

Anyway, enough of the waffle - here   is the link.

Enjoy your day.


Tissue Box Cover

Good morning to you all and thank you for stopping by. I really do appreciate your visit. I hope everybody survived the storms safely.   We were very lucky. Very heavy winds (our property is on fairly high ground so we do catch the wind) and torrential rain but no real damage fortunately.

My Project

Click on image to enlarge pictures


I have thought about doing a tissue box cover for a while and I have finally got round to it.  I used 300 gsm white card stock to make the shell to give a good base and then navy pearlescent card for the layers. The flowers are SB Jewel Flowers and Flourishes. I die cut the flowers with white felt and the flourishes with the same white card stock. I found some blue star brads which have been in my stock for years but they look fine as the flower centres. I also added some small flowers on the top with a blue pearl in the centres. I have never used felt with dies before but it worked so well. And it was cheap felt from Hobbycraft too.

The only problem now is making sure to get the same size tissues each time. If you look on the supermarket shelves there are quite a few different size tissue boxes. When I was in Sainsburys last week these facial tissues were reduced to £1 a box so I got half a dozen to make some more little Christmas gifts.

Hope this finds you all well.


Sunday, 27 October 2013

Another Candle

Good morning friends. Well we are having a pretty mixed bag of weather but it sounds as if early tomorrow morning is going to be the big storm.  We were hit pretty badly back in 1987 so I'm really hoping it will not be so bad.  John was actually working away and I was here on my own which was pretty terrifying. Let's hope and pray that it turns out to be not as bad as predicted and that no lives are lost. I think I had better go out and pick the rest of my Bramleys from the tree before they are blown off and damaged.That will keep me occupied wrapping them for storage over the next couple of months.

My Project


Click on image to enlarge picture.

I thought I would try another candle - just to make sure last time wasn't a fluke! But it was still just as easy. This time I stamped LOTV Angelic Lute onto  tissue paper and again coloured with Promarkers. Once the image was on the candle I used gold stickles on her wings and the stars. I cut two borders with SB Parisian Accents in red card stock and attached top and bottom which seemed to finish it off nicely.  Don't worry, I won't be inundating you with candles, but I did want to be sure it was as easy as I remembered.

Edit: This stamp is actually LOTV Angelic Candle! It was a toss up between which stamp to use which is how I made the error in the name. Sorry about that.

Now all I have to do is find my stamp and die again!! I  have obviously put them down somewhere but for the life of me I don't know where. I guess I laid them down in an unlikely place and I'll come across them eventually.

Hope you enjoy the rest of the weekend.


Wednesday, 23 October 2013

Christmas Candle

Good afternoon.  Hope this finds everybody well and keeping dry.  We have been having very heavy rain and last night a bad storm.  I was sitting at the kitchen table when there was such a noise I thought the window blinds or the window frame was about to land on me.  I actually jumped a few inches! The noise of the rain was bad enough but the thunder seemed to be bouncing off the roof!

My Project


Click on image to enlarge picture

I have wanted to do one of these candles for ages but I thought it would be quite difficult so I kept putting it off.  I came across this small pillar candle at the back of the candle drawer in the kitchen (my emergency supplies in case of power cut) so thought it would be a good one to attempt this technique.  My goodness, this is so easy it's untrue!  I can't believe just how quick and easy! I just popped it onto a little silver candle dish and draped a string of silver pearls round in order to take the picture. They are not fastened on in any way which is why they look messy, but obviously I will decorate it too.  I will certainly doing more of these. I think they will make lovely little gifts.  The image I used is "Little Ivy" from LOTV  and I just coloured it with Promarkers. She is so pretty.

Well that's it for today. I think I'd better start thinking about lunch!


Sunday, 20 October 2013

CCC Challenge - 12 Days Of Christmas

I cannot believe another two weeks has gone by! Today is the choice of my dear blog buddy Planet Susie and Sue has asked us to use the theme of the Twelve Days Of Christmas for our card. Not all twelve I hasten to add, we get to choose the one we want to do.  Can you imagine trying to cram all those "gifts" onto one card. Lol! It's going to be interesting to see if we all have chosen different ones.  I actually bought a digi stamp a few weeks ago for this challenge but can I find the blessed thing? Can I heck!  So I have had to have a change of plan.

My Card

Click on image to enlarge picture


I was in Rymans the other day and noticed a stand with some craft stickers etc, most of which was not anything I would use but I did see these Twelve Days of Christmas stickers. Just in time! As you can see I chose Six Geese A-laying - but I liked the Two Turtle Doves as well so I bought that too in case I have time to do them both. I also liked ......... but I stopped at that point!! Anyway I did make the second card - two for the price of one today!

Card no 1: My usual 6 x 6 card in white card stock which I then matted with navy and red card stock. The red patterned paper is a snippet of Papermania "Home For Christmas" from my scrap box. I computer generated the sentiment and matted it onto red and navy card. A couple of poinsettias from WOC with pearls from Hobby House and a red ribbon and bow finished this little card.  I really love the haughty expressions on the faces of these geese. Or could it be pain/strain from laying the eggs?

Card no 2:  Another 6 x 6 card from white card stock. It was matted with Core'dinations "Vienna Lake" and the patterned paper is from a Create and Craft cd from years ago. I didn't have any patterned paper in the right shade and then I suddenly thought of this cd with so many different patterns and colours, and it is spot on. I computer generated the sentiment onto the paper and die cut it with SB circles and then onto SB  Lacey Circles. The feathery fibre is from my stash and is again very old stuff . I added more Hobby House pearls onto the tiny stars from the Heartfelt Creations Gift Ensemble to finish.

I will soon be off to hop around the cards made by my fellow CCC friends and check out which days of Christmas they have used. I am sure you will be able to hear me singing if you listen carefully. If you would like to check them out yourselves you can find their blogs on my sidebar.

Friday, 18 October 2013

In The Harbour

Good morning friends and fellow bloggers. Thank you for paying me a visit today. I know how busy everybody is so the fact that you take a few minutes out of your day to come calling and leave me a comment is very much appreciated.

My Card


Click on image to enlarge picture

I have had this digi for a while but not used it so I decided it was high time it made an appearance.  Another male card to add to my box for whenever it is needed.  The digi image is "In The Harbour" from Delicious Doodles and coloured with Promarkers. I matted it onto dark blue pearlscent paper. This is a 7 x 5 card made from white card stock and then I added a mat from the LOTV Krafty Christmas Paper Pad. The blue striped paper, which I again matted onto the same dark blue pearlecent paper is from the LOTV Petal Fresh Pad. I bought this hessian stuff last year and it has been stuffed in a drawer and never used - and now this is the second time in a week. I thought it matched the fishing boat theme quite well. The anchor was on one of John's birthday cards at some stage and I cut it off thinking it would come in useful sometime - and that sometime is now.  I originally planned to add a little anchor charm, but when I looked in the box of charms it seems to have disappeared. So annoying.

Well the weather has been really wet and miserable since the weekend. But that means that in a couple of months our main well will be filling up, (it takes around 3 months for the water to permeate the rock etc and raise the water table)  and the surface, rain water,well is certainly filling up nicely! I'm thinking positively Lol!) Yesterday we attended my friend's mum's funeral and fortunately the weather was very cold but dry and sunny.

Hope you are all well.


Wednesday, 16 October 2013

Acetate Stepper

Hi! I do not like these misty murky mornings. You know, it has just brought a song to mind that we used to sing at school when I was very young - "One misty, moisty morning when cloudy was the weather, There I met an old man clothed all in leather." Well that's done it for me because I'll be singing that all day now - until something else reminds me of another song!!

My Card


Click on image to enlarge pictures


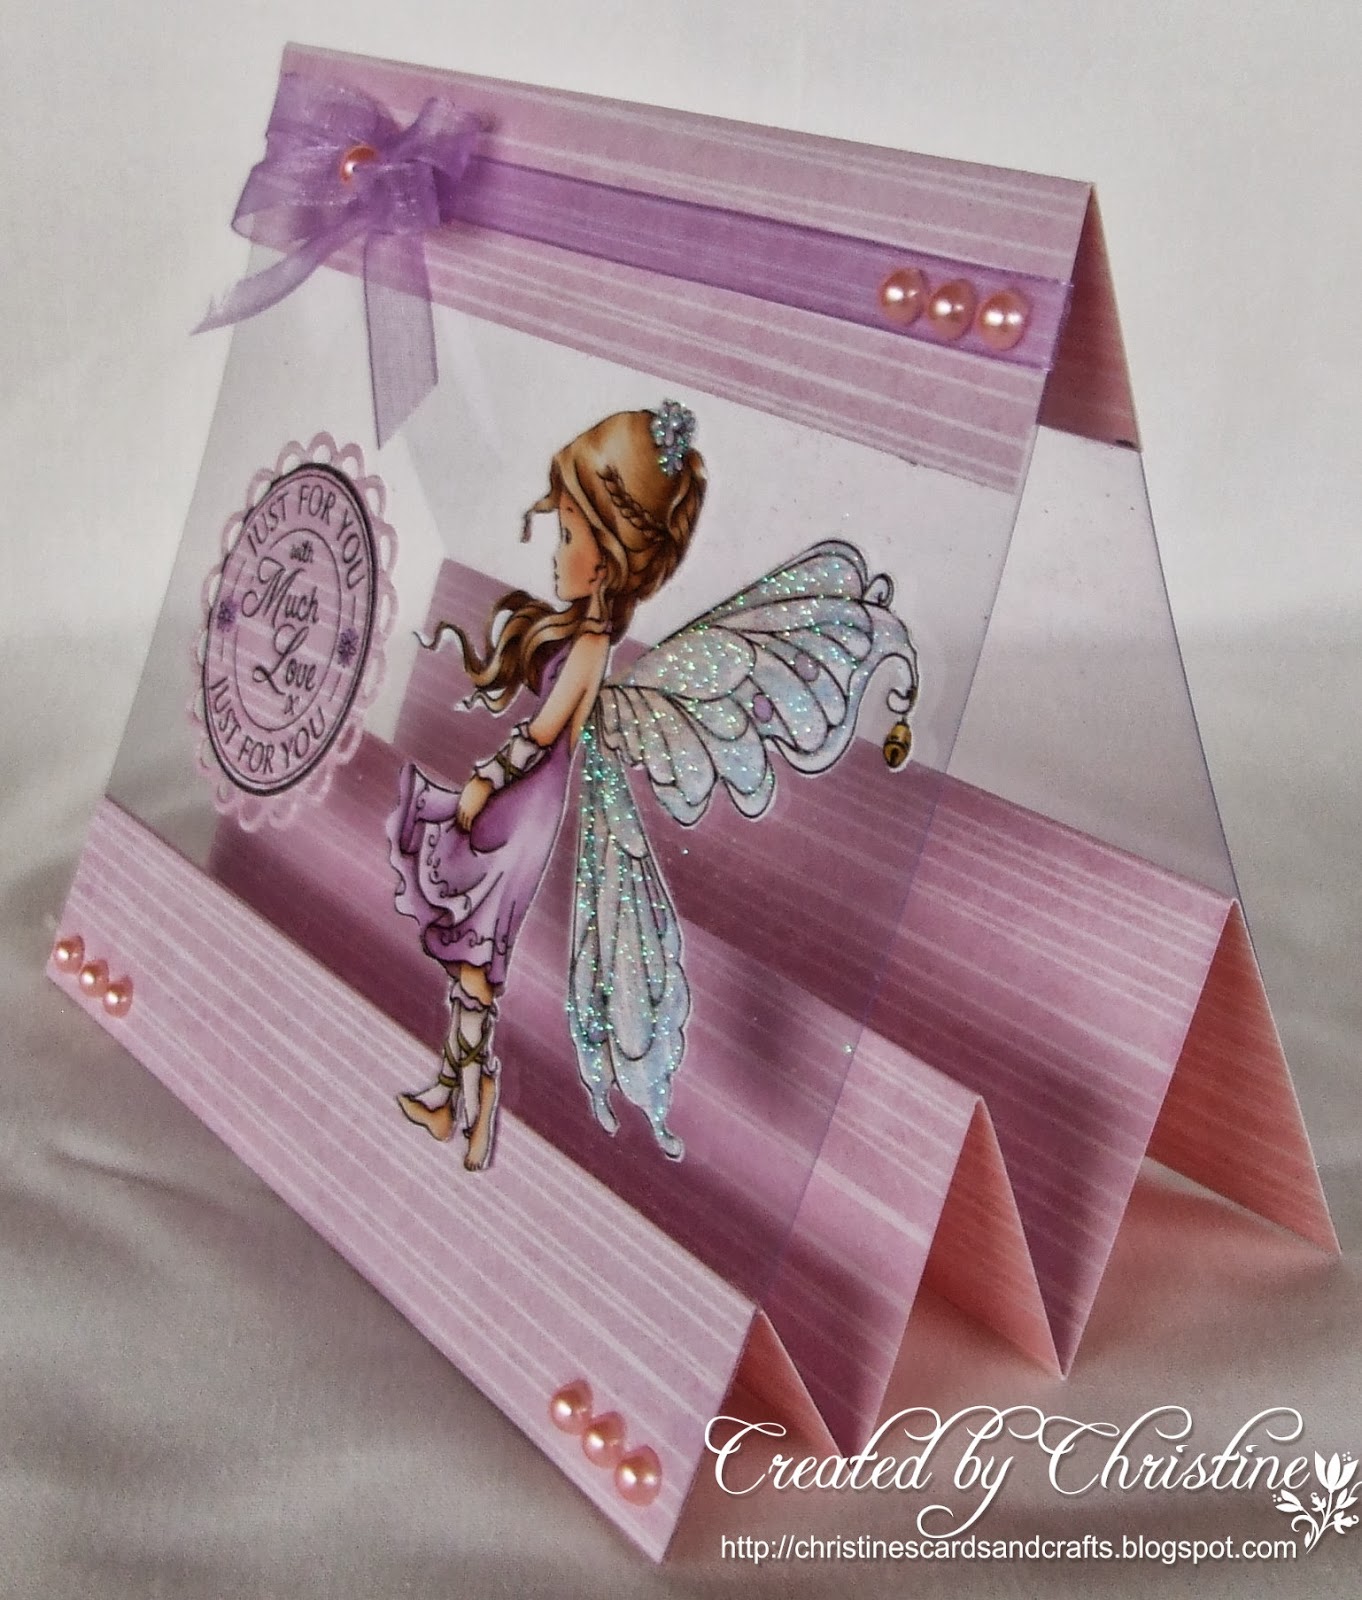
A few months ago on Doreen's blog  (Doreen's Dream) she made a card  using acetate  over it. I liked the idea but never thought any more about it.  Anyway, I came across my thick acetate yesterday and this project came into my mind so thought I would have a go.  I couldn't find her card so I just had to do what I think I remember!

I made a stepper card and then stuck the acetate over it to form a tent shape. I added some more card stock over the fold and across the bottom of the acetate. The image is a topper from Hobby House, using  a Wee image, that I fussy cut after first adding a little more colour with Promarkers and lots of glitter to her wings. The sentiment is LOTV and die cut with SB Lacy Circles. I then just added some ribbon and pearls. I kept it very simple, but it is such an easy card to do that I shall certainly be doing it again and elaborating on it. The pink card stock is from one of the First Edition pads and since it was an offcut  left from another project I don't know which one.

Keep well and warm everybody.


Entered into:

Monday, 14 October 2013

A New Home

Hello everybody.  Today I am posting a card for my nephew who has just moved house.  I know I seem to talk about him a lot but I don't have children of my own so I have "borrowed" my sister's son and he and his children are very close to John and me. Today  is his dad's 70th birthday. Happy birthday Michael and get well soon!
My Card


Click on image to enlarge picture

This is a 6 x 6 card base. I ran some white card through SB Dainty Dots folder, cut it into various sized rectangles and matted them all onto red card. The image was an internet find. I computer generated the sentiment together with the tiny house. Some red ribbon and pearls finished it off nicely.

Have a good day everybody and I hope you manage to fit in some crafting time!


Saturday, 12 October 2013

Male Birthday Card

Hi. My goodness yesterday was so cold and windy. We lit the fire just after lunch - I don't intend being cold in my own home! John will just have to keep chopping down trees. Lol. He bought a log splitter last  weekend so it will make life easier for him.

Here I am with another male card again.  I have had so many to make this year that I have totally lost my terror of men's cards.  They are not my favourites by any means - you can do so much more for the ladies!! - but I don't recoil in horror at the thought now.

My Card


Click on image to enlarge picture

As you can see this was inspired by one of Sue Wilson's cards a couple of weeks ago and it was for my nephew to give to his dad. I posted the one I made for my sister to give - and totally forgot to take a picture of my own. Early onset dementia!!! I again used the "Explore" stamp set and matching Vintage Labels 4  dies from JustRite Stampers.  I die cut the large label from an old map of Europe which I found on the internet. The cogs and sprockets were die cut from Papermania Chronology Collection. This card is 6 x 6 and made as an easel card - obviously.  I placed the sentiment verse on the underside which then makes it quite private to put a personal message on.  Darren like it anyway, and he also thought the retirement card I did for him was great. (Well not actually for him but his colleague!)

Well that's it from me.  Hope you are all well but if not I hope you get better quickly.


Thursday, 10 October 2013

Christmas Card Club - Upcycle

Hello my dear friends and blogging companions.  I am so sorry for my absence.  This card was due on Sunday and though I knew it was going to be late I was hoping I could do it in time for Monday.  Unfortunately my friend lost her mum suddenly on Sunday  and was devastated.  I know exactly how that feels because that is just what happened with my mum, so I have spent quite a bit of time with her offering what little comfort I could.  I made her a sympathy card but then forgot to take a picture before I gave it to her. Typical!

Anyway back to this particular card. This time it was Maureen's choice (aka Scrappy Mo) and she asked that we upcycle an item onto our card.

My Card


Click on image to enlarge picture
When I receive a card that is too nice to just throw away I either keep the card or I take off the bits that I like, the idea being to use them on my own cards. However that rarely happens - but the intention is there!  So this time I rescued a card front that I took from a Christmas card years ago.  I die cut  this sweet little angel using SB Classic Ovals and then matted it with some red card die cut from SB Classic Scalloped Ovals.  Would you believe there was no glitter on my lovely angel?  Well, I soon corrected  that omission. Lol! The candles and baubles border along the top was printed from one of my Greeting Card  programmes, but I can't remember which one. I used an MS punch on it.   A little bow and some pearls finished it off. It wasn't until I took the picture that I realised I hadn't put a sentiment on so I will think about that, but it doesn't look too bad without it.  What a block head!  I am trying to keep my cards pretty flat this year to avoid huge postal charges.

Well that's all for today. Hopefully I can get back to some more regular posts now.  I apologise for not visiting you over the last few days but I will rectify that today. I hope this finds you all keeping well.


Friday, 4 October 2013

Neat and Tidy Steam Punk

Hello everybody. Thanks for popping by today.  My title certainly seems to be a contradiction doesn't it?
Q:   How can steam punk be neat and tidy?  A:  When it is made by me! Lol!  As my older followers know (and by that I mean long term not old as in age!) I don't do steam punk.  I like my crafting to be quite neat - I even find shabby chic a bit out of my comfort zone.  However, I have had these Kanban toppers for a while and am steadily working through them.

My Card


click on image to enlarge picture


This card is for my sister whose husband will be 70 next week.  Unfortunately he had a small stroke a few weeks ago and is temporarily unable to drive.  His  post-stroke exhaustion meant he was not able to get out much, until their son hit on the idea of hiring one of those mobility scooters for a few weeks.   Now when they go out together to exercise their little dog poor Jeanie is shattered trying to keep up with him!  As for Mollie, their miniature Yorkie, she gets back home and zonks out!! My sister loved the idea of this image because it fit the situation so well.  Mind you, I wouldn't like this one roaring up behind me in the shopping precinct. Lol!

Sorry for the glare but the sun was hitting the gold mirri card no matter what I did to try and prevent it.  I'm not complaining about the sun - but I will try again later if it goes behind a cloud.

I made an easel card and put the verse underneath the base of the card.  The topper and cogs background card are from Kanban and the cogs are a mixture of some die cuts I already had and others cut from Papermania cog dies.

Well that's all from me today 


Tuesday, 1 October 2013

Retirement Is A Journey

Hello friends. Thank you for taking the time to pay me a visit.  I know we all lead very busy lives so I am grateful that you have found time to call.

This card is for my nephew to give to a consultant colleague who is about to retire. He has been a great mentor to Darren over the years and he wanted something unique for him.  I made three for him to choose from the last time but this time I have only made two.  If I get chance I will do another, but it is unlikely.

My Card


Click on image to enlarge picture

This is my favourite 6 x 6 inch size card cut from  tan coloured card stock.  The antique map is a picture I found on the internet sometime ago and thought it would come in useful at some stage.This was matted onto navy card stock and then attached to the base card.

The balloon ship stamp is from the JustRite "Explore Vintage Labels 4" set and die cut  with  the matching Vintage Labels 4 dies.  I stamped it with Memento Rich Cocoa and then coloured with Promarkers.  I mounted it on to the navy card which I cut into a pennant. The words Travel and Explore are from the same stamp set and stamped directly onto the card - dangerous for me but I got away with it this time! Lol!  I computer generated the sentiment onto the tan card and matted onto the navy card and again trimmed into the pennant.

I wasn't sure where I was going with this when I started, but I'm quite pleased with the result.

Well that's it for me for today. Hope you all have a pleasant evening.


Challenges
http://crafts4eternity.blogspot.co.uk/2013/09/r143-anything-goes.html